3 Simple Steps To Setup Authentication in Next.js
In this tutorial, we will see how to easily set up authentication for Next.js apps.
Step 1. Create Next.js application
yarn create next-app next-auth
# npx create-next-app next-auth
This will create a new Next.js application. You can remove unnecessary files and make the structure as below.
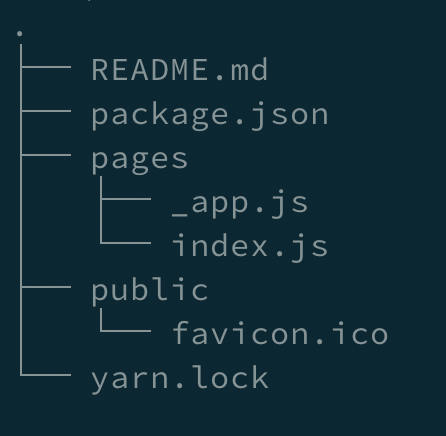
My pages/index.js just contains the following
// pages/index.js
export default function Home() {
  return (
    <div>
      <h1>Hello World</h1>
    </div>
  )
}
Step 2: Install NextAuth and SQLite packages
I will be using SQLite as my database for this tutorial, but next-auth supports all of the popular databases.
yarn add next-auth sqlite3
# npm install next-auth sqlite3
Step 3: Setup NextAuth API Route
Create a file with name [...nextauth].js under /pages/api/auth and add the following content in it.
// pages/api/auth/[...nextauth].js

import NextAuth from 'next-auth'
import Providers from 'next-auth/providers'

const options = {
  providers: [
    Providers.GitHub({
      clientId: process.env.GITHUB_ID,
      clientSecret: process.env.GITHUB_SECRET
    }),
  ],
  database: process.env.DATABASE_URL,
}

export default (req, res) => NextAuth(req, res, options)
Now, all the calls made to /api/auth/* will be handled by next-auth.
In this example, only the GitHub authentication provider is added. But next-auth supports all of the following providers by default.
Apple            Email            Okta
Auth0            Facebook         Reddit
Basecamp         GitHub           Slack
BattleNet        GitLab           Spotify
Box              Google           Twitch
Cognito          IdentityServer4  Twitter
Credentials      LinkedIn         Yandex
Discord          Mixer
You can even add your own provider. More details here.
Create .env.local file at the root of the project and add the environment keys that we used in the [...nextauth].js file.
# .env.local
GITHUB_ID=a8451b4a*********
GITHUB_SECRET=95be17c33**********
DATABASE_URL=sqlite://localhost/:memory:?synchronize=true
Replace values for GITHUB_ID and GITHUB_SECRET with your own keys. You can follow the steps described here. While creating that OAuth app, add http://localhost:3000/api/auth as Authorization callback URL. The rest of the fields, you can fill with anything.
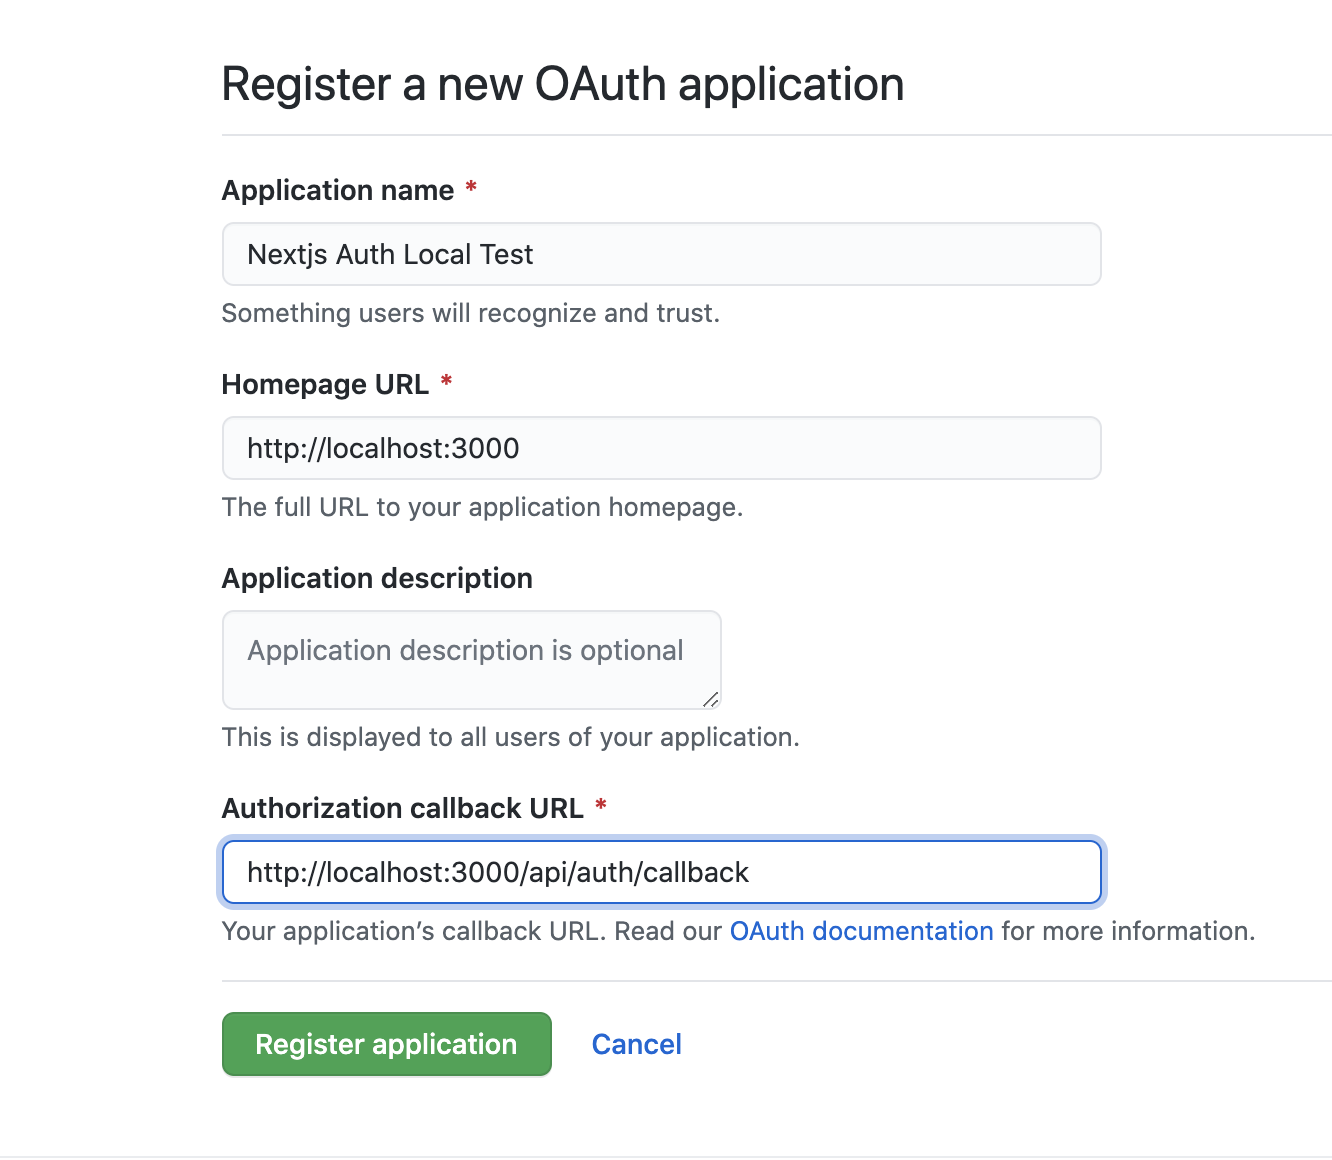
After this, go to https://github.com/settings/developers and open the newly created OAuth App to get GITHUB_ID and GITHUB_SECRET and add them to the .env.local file.
Now, add SignIn and SignOut buttons in your index.js page.
// pages/index.js
import { signIn, signOut, useSession } from 'next-auth/client'

export default function Home() {
  const [ session ] = useSession()
  return (
    <div>
      <h1>Hello World</h1>
      {session ? (
        <button onClick={() => signOut()}>Signout</button>
      ) : (
        <button onClick={() => signIn()}>SignIn</button>
        )}
      {session && (
        <div>
          <small>Signed in as</small>
         <br/>
          <strong>{session.user.email || session.user.name}</strong>
        </div>
      )}
    </div>
  )
}
That's it. Your app now has GitHub authentication setup.

If you want to see a more full-fledged example, you can download official next-auth-example provided by NextAuth.js.
Another important thing to note here is that NextAuth.js can be used with or without a database. It also has a password-less login built-in similar to the one you have on Hashnode. You just have to provide the EMAIL_SERVER details, and you are set up. This package makes setting up authentication a breeze. You no longer need to have a separate backend just for the sake of having authentication.
Links and References:
What's Next?
The next article will most probably be a part of My Review of Kent C. Dodds's EpicReact.Dev series. Go to that series page to know more.
Until Next Time 👋
If you liked this article, check out
You can @ me on Twitter (@pbteja1998) with comments, or feel free to follow me.
About the author
Full-Stack Developer, Entrepreneur and Co-Founder of Coderplex.
Building https://coderplex.in
Checkout my portfolio at https://bhanuteja.dev
Comments
Join the discussionThanks for this! Just wondering, what would the callback URL be when deployed to production? Replacing "localhost" with the app url doesn't seem to work...
Check whether you have http or https. Also check if you have set NEXTAUTH_URL to the url of the application url or not.
https://next-auth.js.org/getting-started/example#deploying-to-production
Check this blog post where I have shown deploying an application which also has NextAuth (GitHub Auth and Password-less Auth)
https://blog.bhanuteja.dev/nextjs-starter-with-authentication-react-17-typescript-tailwind-css-2-eslint
Super useful! Thanks Bhanu :)